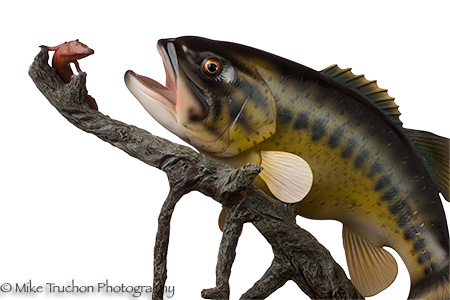
A white background is a great way to bring attention to the subject of a photograph. There are several methods (capture and post-process) to create a white background and one of the most efficient methods is to create the white background at image capture. To create a white background at image capture, lighting the image in layers can help properly transform the background to pure white while properly exposing the subject.
Lighting the image in layers means to expose each piece (or layer) of the image independently until all pieces are illuminated to the photographer’s final vision. Visualizing each layer of the image as a separate entity and illuminating each layer individually can help create a white background fairly easily. In addition, creation of the white background at image capture greatly reduces post-processing effort.
The lighting for the bass and mudpuppy, the photograph below, required two speedlites, one white reflector board, a translucent umbrella and a white sheet. Specifically, the white background was created with one speedlite set at 50mm and ½ power that was three feet behind the white sheet. The second speedlite was under an umbrella to the left of the bass and the white reflector was to the right of the bass. The bass was ten feet in front of the white background to minimize wrap around (described below). The photographs below display how each layer was exposed toward the creation of the final image.
The first image taken is pure black with the shutter speed set at 1/250 (sync speed) and an aperture of 16. As can be seen, nothing is visible. The reason for this initial shot is to ensure any ambient light (room light) does not impact the photograph at that shutter speed and aperture combination.

The first layer photographed determines the proper exposure for the background. It is important to ensure the background is as white as possible but does not impact the subject. If the power for this speedlite is to high, background will be to bright thus there a chance of wrap around (light reflected off the background that illuminates the subject). If the power for this speedlite is not bright enough, the background will not be pure white thus more difficult to work with in post processing. One factor to remember is that the brightness is impacted by both the power of the speedlite and the distance of the speedlite to the subject. Thus both of factors must be taken into consideration with regards to the background and the subject.
The problem with wrap around is the subject can potentially become overexposed in the final image. As noted above, the final speedlite setting was 50mm and ½ power. This final background exposure was determined by initially taking a test shot at full power. After the power was reduce by one stop (to ½ power) another test was made that resulted in the correct background exposure, any further power reduction would reduce the “pure white” look of the background.

The image below shows the impact of wrap around. A 100% crop of the background lighted layer as shows the impacts of wrap around. The crop on the left is at full power photograph while the crop on the right is at ½ power. The wrap around can be observed with the around the body of the subject on the right, the subject is not pure black. This potentially leads to overexposure of the final image.

The next layer photographed was the subject using the key light; the speedlite and umbrella. If photographing a non-white the best approach would be to turn off the background light and determine the proper setting for the subject. Since the background is white there is no need to worry about impacting the background. The key light, a speedlite and inverted umbrella, positioned as close as possible to the subject to determine the proper power. The final setting of the key is 28mm at ¼ power. The image below shows the mudpuppy and the head of the bass lit by the key and the background is white (settings from above). Though the mudpuppy and head of the bass are properly illuminated, notice that the top and side of the bass still require some brightening.

In order to brighten the body, the white reflecting board was placed just out of the camera’s view. The white board was positioned at a 90 degree angle to the key light. With only the addition of a white reflector, the top and side of the bass is now well lit. Again the power of the background and key speedlites are set from above.

The lighting in layers technique can be applied in many situations including non-white backgrounds. When lighting photographs with non-white backgrounds be sure to turn off the background light to help determine the correct exposure for the subject. By turning off the background light, light that spills from the key light to the background can be easily identified. The spill situation may cause the background to become overexposed. With the background light off (the background typically appears black of dark gray) the subject can be exposed without the luminosity of the background misleading the photographer vision.

