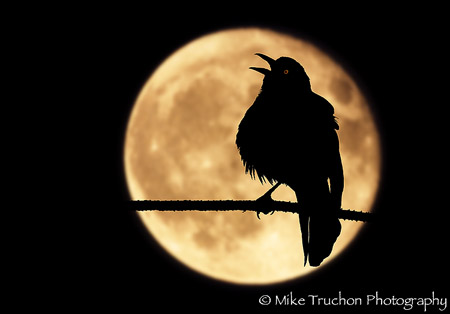
As the Rolling Stones song goes “You can’t always get what you want but if you try, sometimes well, you might find you get what you need.” This was certainly the case with the Raven’s Eye and the challenges that I faced; alignment of the bird and moon, a full moon and a bird on a branch. Once it became obvious to me that coordinating these events was going to be at best difficult, I decided to take a different approached and manually create my vision.
Both the moon and bird were taken at different times, the moon at night and the bird during the day. The moon, is actually a scan of a picture that I took several years ago. The bird is one of many that I have taken positioned on a white background. The result is a composite image that met my vision of a silhouetted bird in a glowing moon. The steps that I took to create the image along with the Photoshop layers are detailed below.
Moon
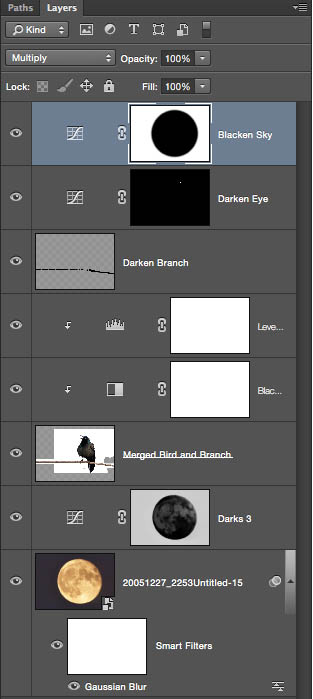
The moon was imported as a smart object for two reasons. A smart object allows for nondestructive multiple edits to an image without reducing the overall quality of that image. Since the size of moon needed to be increased and also blurred, a Photoshop smart object was the best way to manipulate the image.
Moon Adjustment
The empty sky surrounding the moon required darkening. A luminosity mask on a curves adjustment with a multiply blend mode darkened the sky properly. The multiply blend mode multiplies the pixels together thus the result are darkened pixels.
Raven
The raven also had to be adjusted, thus it also was imported as a smart object. Once sized correctly in comparison to the moon, the transition of the branch from moon and sky had to be adjusted. The branch was extended both sides of the raven which provided a smooth transition from the moon into the night sky. Once the branch was extended, the three layers where merged into a single layer. The white background of the raven image was eliminated with the darken blend mode. This blend mode compares the two layers and only displays the darker of the pixels, thus the white background is completely eliminated.
Adjust Raven
In order to create the silhouette, two types of clipping mask adjustments were applied to only the raven layer. A clipping mask applies the adjustment to the the pixel layer directly beneath that layer without impacting any other layers. First, a black and white clipping mask adjustment was applied to eliminate any color remnants made by the following levels adjustment. Then the noted levels clipping mask adjustment was added and manipulated to turn the raven into a black silhouette.
General Cleanup
At this point the image was coming together but the branch required some touch up. On a separate layer, the areas that required darkening were painted black.
Raven’s Eye
A curves adjustment with the multiply blend mode was use to create the mysterious aura of the raven’s eye. The entire adjustment was masked except for the eye.
Final Adjustments
After review, the sky appear light so it was slightly darkened. A curves adjustment layer masking the moon was created with a multiple blend mode. This adjustment was all it took to slightly darken the sky and leave the moon untouched.
You can’t always get what you want but if you try sometimes you might create what you need as is the case with The Raven’s Eye.